VPN Service of the University Computer Centre
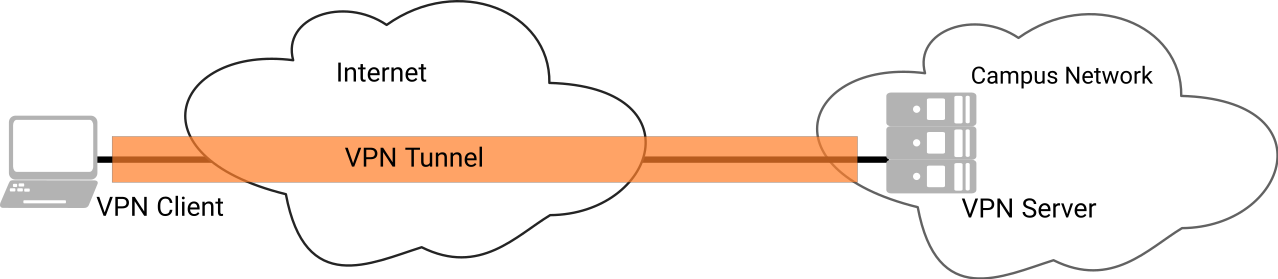
VPN stands for Virtual Private Network and enables secure connections to be established via insecure networks.
The VPN Service
In principle, insecure networks enable unauthorized interception and falsification of communication relationships. To prevent this, VPNs use special protocols that encrypt the data. In principle, a tunnel is set up between your computer at home (or on the move) and a VPN server at Chemnitz University of Technology, through which all IP data is sent in encrypted form.
Whom is this service intended vor?
- Users who want to securely access the Chemnitz University of Technology campus network with their computer via external Internet providers.
- Users who want to access the campus network securely from a connection at another university or from any other Internet access (e.g. on business trips, congresses, etc.) .
- Users who want to securely access the campus network with their computer via data sockets in public rooms of the Chemnitz University of Technology.
When the connection is established, authentication is carried out with your URZ user ID and your password. If necessary a second authentication factor is requested (see Multi Factor Authentication).
If a VPN tunnel is successfully established, the computer receives an IP address from the Chemnitz University of Technology address range. This also allows access to services that require a sender address from the university's address space.
Preconditions
- a valid username
- computers with functioning internet/network connection or functioning wifi connection in the wifi network
A so-called VPN client must be installed on your computer. The URZ recommends the freely available VPN client EduVPN. Alternatively, Cisco Secure Client (Anyconnect) is provided.
VPN Service „eduVPN“

eduVPN is the worldwide VPN service for students, researchers and lecturers. Basically, eduVPN realizes two central application scenarios:
- Secure access to the TU Chemnitz campus network (Institute Access)
- Secure access to the worldwide academic networks (Secure Internet)
Further information on eduVPN can be found on the website of the eduVPN project.
At Chemnitz University of Technology, eduVPN is currently offered as an alternative to the VPN access “Cisco AnyConnect” and is particularly recommended for the provision of VPN connections on smartphones and tablets with Android or iOS.
After a successful registration via the Chemnitz University of Technology Web-Trust-Center, access to the campus network is valid for 90 days. During this time no further password entry is necessary. Usability and convenience are therefore very high. Depending on the user authorization, different VPN profiles for different use cases are offered.
VPN Profiles
Different VPN profiles can be selected for different application scenarios.
| VPN Profile | Use Case | Recommended for |
| Standard VPN Access |
|
|
| Groupware only |
|
|
Installation
The setup and installation is very simple and is identical on all platforms and operating systems.
Step 1: Download and Installation
You must install the EduVPN app. To do this, use the corresponding download/installation links for your operating system:


If the installation does not start automatically, open the folder “Downloads” folder and execute the installation file.
Alternatively, you can access the respective installation instructions via the eduVPN download page.
Step 2: Institute Access: TU Chemnitz
The second step is to select TU Chemnitz as an institution.
To do this, enter the word “Chemnitz” under “Find your institute”. You will then be offered two operating modes for TU Chemnitz (1. access to the institute/Institute Access and 2. secure internet/Secure Internet). Please always select the 1st mode: access to the institute/Institute Access.

Step 3: Registration at the Web-Trust-Center of Chemnitz University of Technology
A browser window will automatically open with the Chemnitz University of Technology Web Trust Center. To log in here, use your URZ account, i.e. your user ID and password.
If you have activated multi-factor authentication and are logging in from outside the campus network, a second factor (one-time password app or Yubikey) will be requested.

Step 4: Approve VPN access
After successfully logging in, you will be redirected to the “Approve application” page. You must now approve VPN access. To do this on the blue “Approve” button. You will then see the message “You can now close this browser window”.
Close the browser window and return to the app eduVPN if it does not automatically come to the foreground

Step 5: Select Profile
You can now choose between different profiles, such as “Standard VPN access” or “Groupware only”. The application recommendations for the various profiles can be found in the section VPN Profiles. By selecting the profile, you establish a VPN connection.

Step 6: Access successful!
You are now authorized to establish the VPN connection for 90 days without having to log in again. You can activate or deactivate this at any time using a simple on/off switch. You will only need to enter your user ID and URZ password again after 90 days have passed (see step 3).


VPN via Cisco Secure Client (AnyConnect)
Here you will find instructions for setting up the VPN client Cisco Secure Client (Anyconnect) on the various platforms.
Windows
The installation requires adminstration rights.
- Load the installation package on your computer: cisco-secure-client-win-5_1_2_42-core-vpn-predeploy-k9.msi
- Start the downloaded MSI file.
- Confirm the welcome window with „Next“.

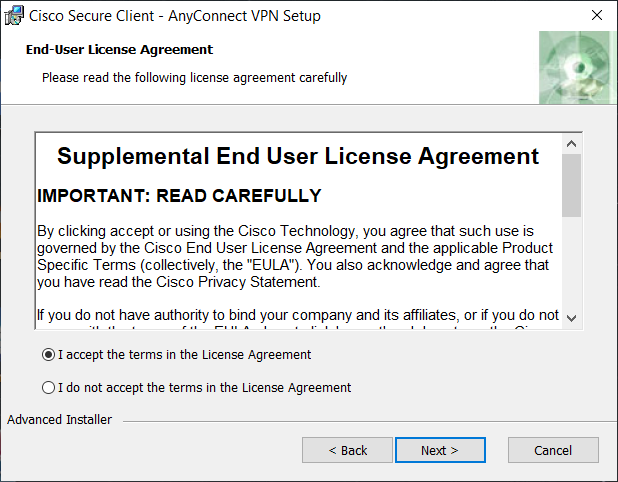
- Accept the licence terms. Click „Next“.
- Start the installation with „Install“.
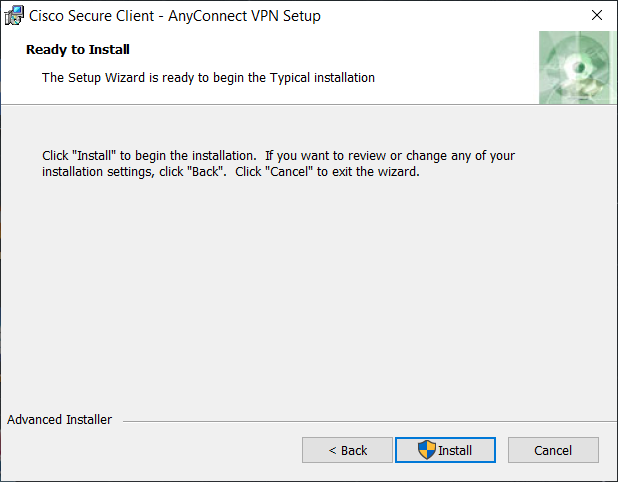
- The installation is carried out.
- After the successfull installation, complete with „Finish“.

- As a normal user, start the client from the start menue.

- You'll find notes for configuration and use under: Instructions for use of Cisco Secure Client
Linux
The installation requires root rights.
Script controlled installation archive: cisco-secure-client-linux64-5.1.2.42-predeploy-k9.tar.gzThe installation is descripted using the script controlled installation archive:
- Load the installation package on your computer: cisco-secure-client-linux64-5.1.2.42-predeploy-k9.tar.gz
- Unpack the archive.
tar xvfz cisco-secure-client-linux64-[release]-predeploy-k9.tar.gz - Change to the directory vpn. Start the script vpn_install.sh.
cd cisco-secure-client-[release]/vpn
./vpn_install.sh - Copy the „Root Certificate ISRG Root X1“ to the ca-directory.
cp isrgrootx1.pem /opt/.cisco/certificates/ca - As a normal user, start the client on the command line:
or via the graphical user interface:/opt/cisco/secureclient/bin/vpnui - Notes on configuration and use you'll find under: Instructions for use of Cisco Secure Client
macOS
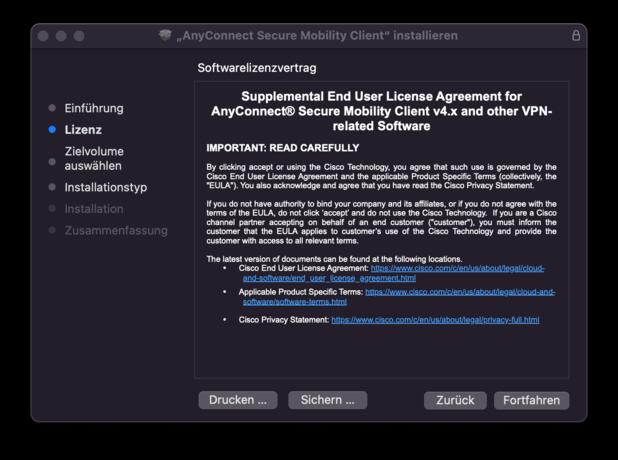
- Please read this instuction until the end. It is important to choose the option during the installation!
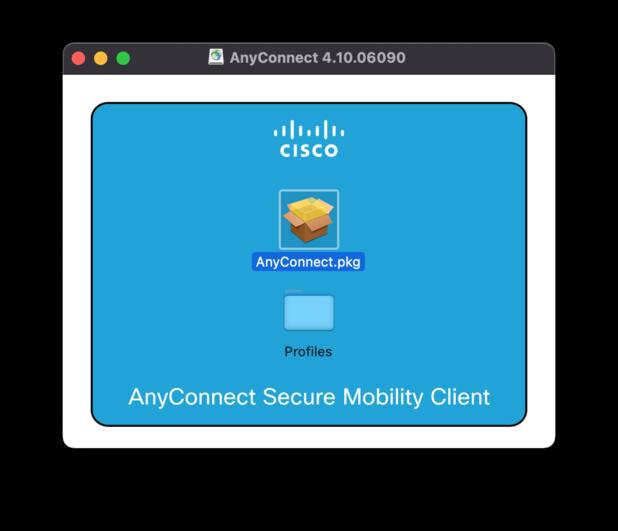
- Load the current installation package on your computer: cisco-secure-client-macos-5.1.2.42-predeploy-k9.dmg
- Start the installation by double clicking the VPN icon.
- Follow the first step of the installation instruction and read and accept the licece after that.
If you only have one drive in your Mac, the "Select target volume" point is automatically skipped.
- It is important to remove all tick marks in front of all packages, except “VPN”. These software modules are not necessary
for a successful connection and can even be disruptive.
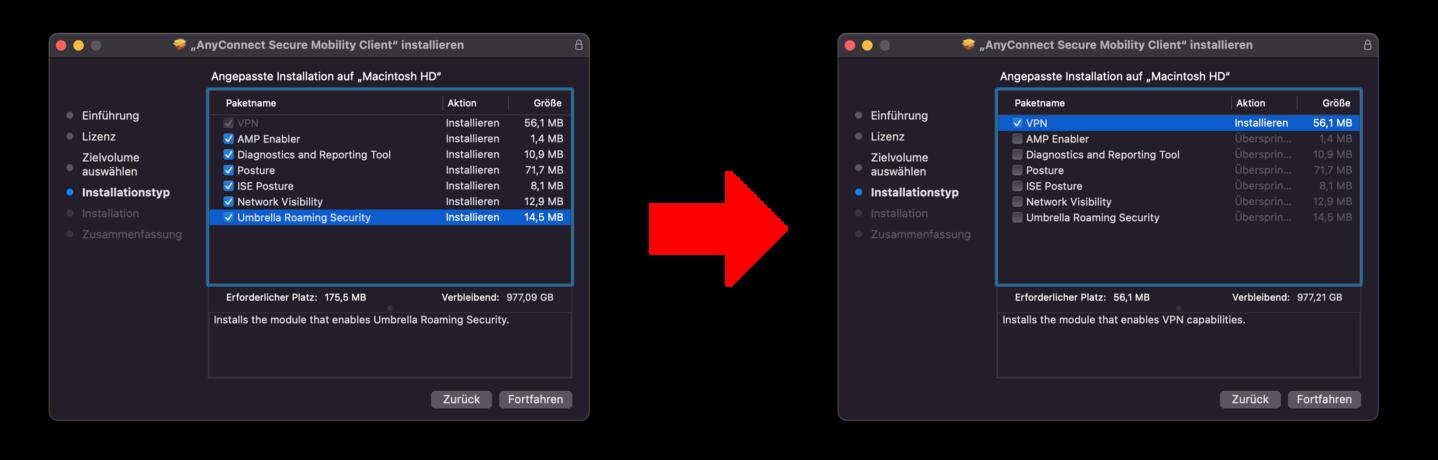
- In addition, the installation instructions will inform you about the required storage space and provide a summary.
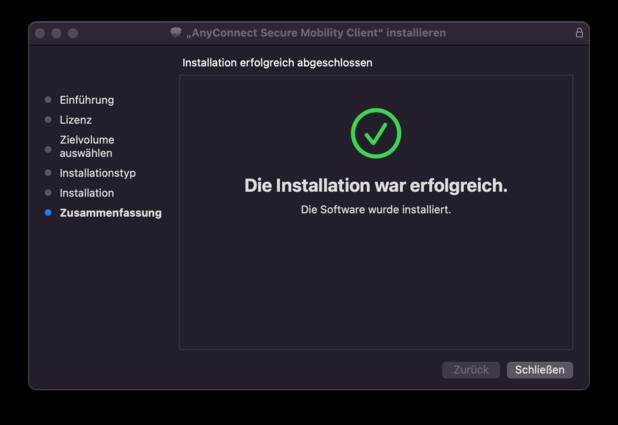
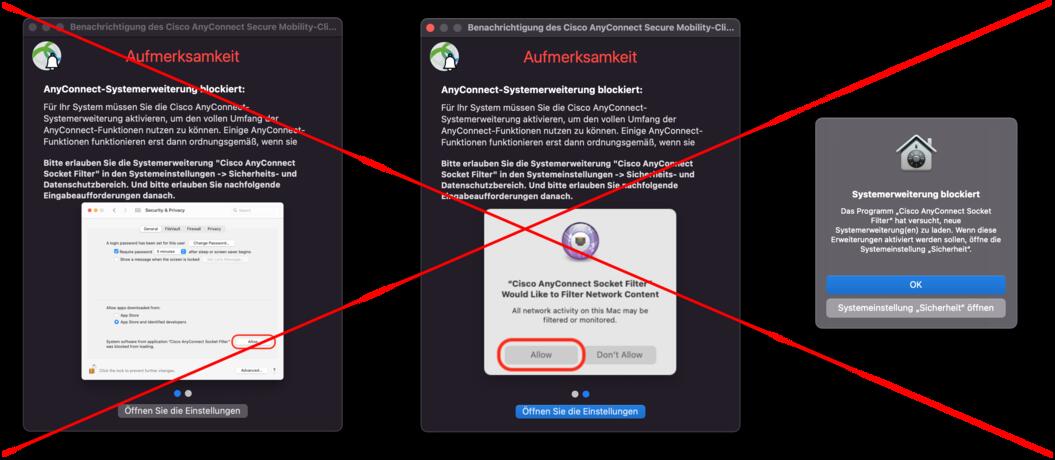
- Once the installation is complete, AnyConnect will open a large window labelled “Attention”. In this window, you are urgently requested
to make settings in the “Security & Privacy” menu. Do not make these settings. With a few exceptions,
you will not need the installed function “Cisco AnyConnect Socket Filter”.
On the contrary, previous experience has shown that if you agree to install the “Cisco AnyConnect Socket Filter”, your Mac may become
slow due to high processor load and consequently battery life will decrease!
Just close this window!
- You can now start the Cisco AnnyConnect Client.
After start, you have the possibility to enter the VPN server of the university: “vpngate.hrz.tu-chemnitz.de”
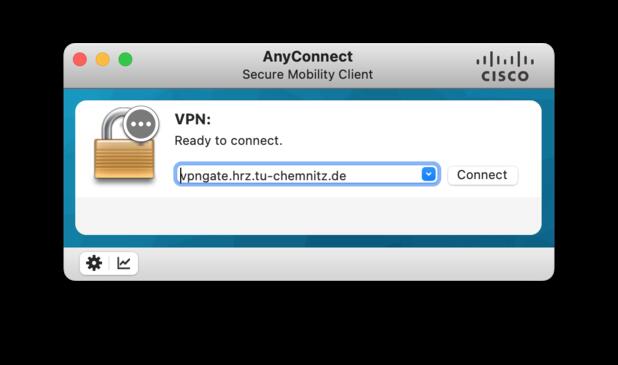
- After entering the correct server name, you can click on “Connect”.
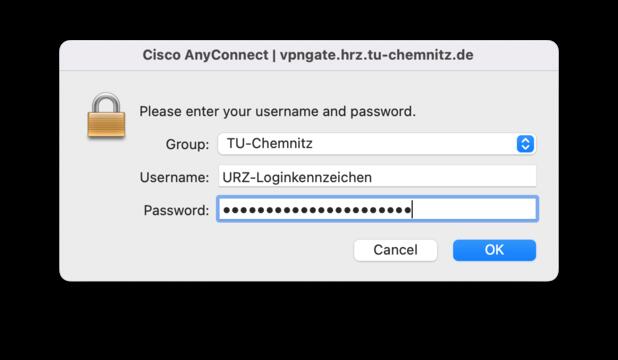
Cisco AnyConnect will ask you for your TUC-username and TUC-password.
The error occurs in macOS due an API change made by Apple. Cisco Secure Client needs uses this new API since version 5.1 and therefore needs new authorisations.
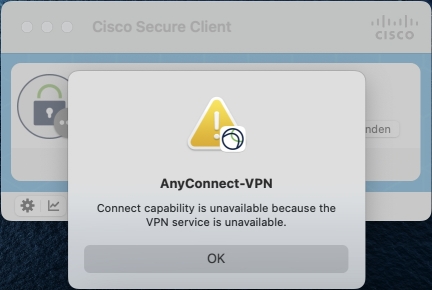
To remove this error, you must allow background services for Cisco Secure Client.
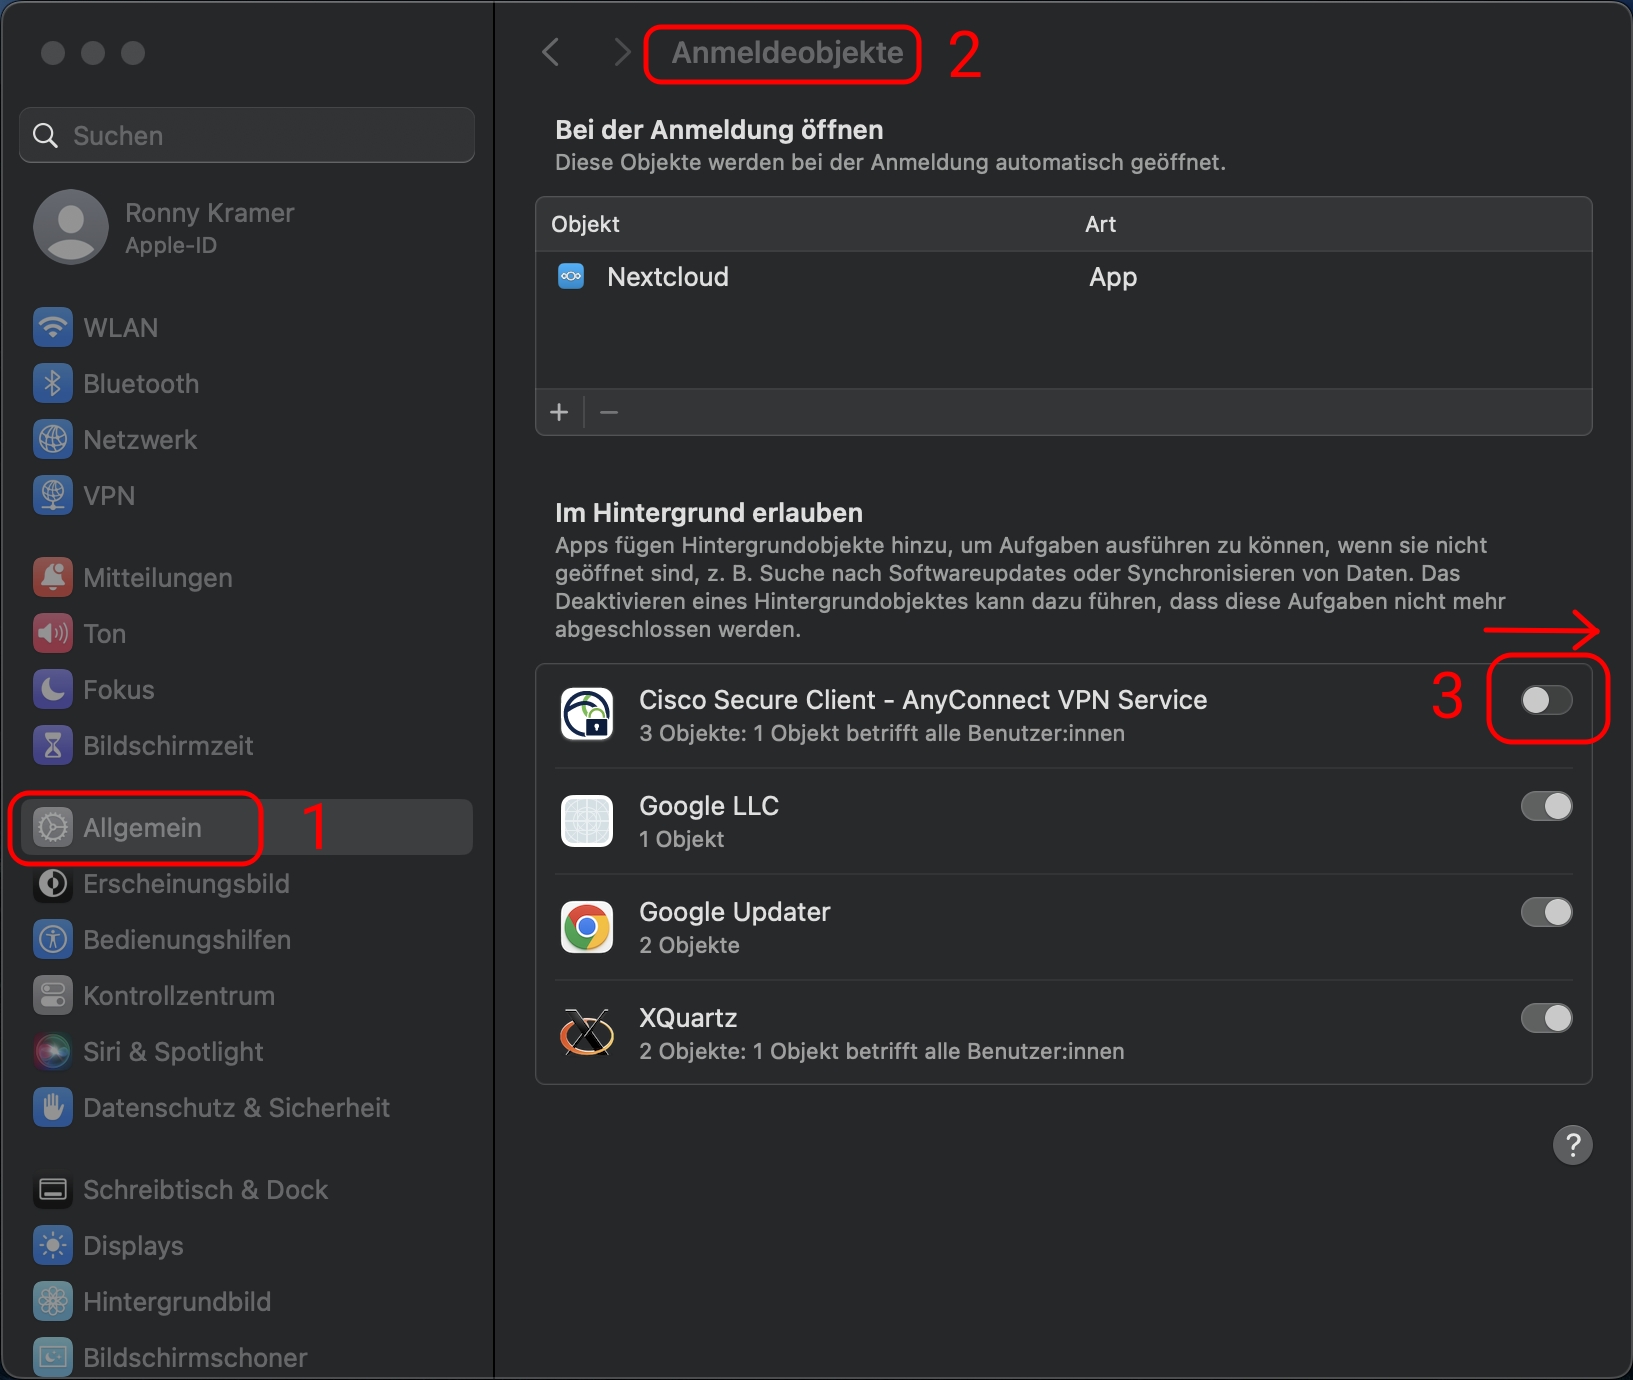
Open the system settings and go to „General“.
On the right-hand side open the submenue „Login Objects“.
In „Allow in background“ allow the „Cisco Secure Client – AnyConnect VPN Service“ by moving the slider to the right.
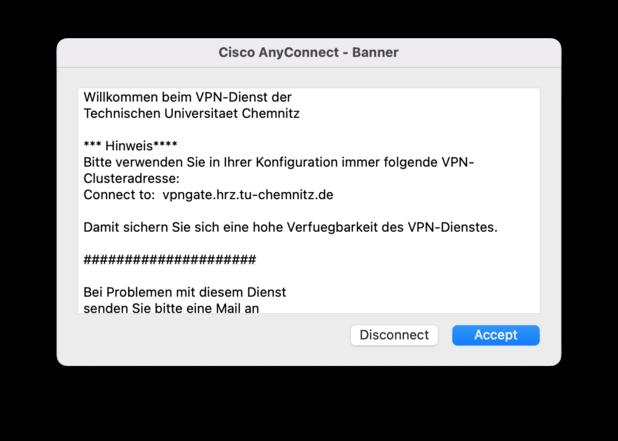
- Once you have entered your login details and everything has gone smoothly, you will be welcomed by our welcome message.
iPhone/iPad
A version of Cisco Secure Client for iPhone/iPad is available in the iTunes Store. There, search for Cisco Secure Client and install the program. Start the program and select Add new VPN Connection. Use vpngate.hrz.tu-chemnitz.de for the server address.
Android
A Version of Cisco Secure Client for Android is available in the Google Playstore. There, search for Cisco Secure Client and install the progra,. Start the program and select Add new VPN connection. Use vpngate.hrz.tu-chemnitz.de for the server address.
Instructions for use of Cisco Secure Client
The initial configuration and instructions for use are explained using the Cisco Secure Client under Windows as an example. These also apply to the clients on the other operating systems.
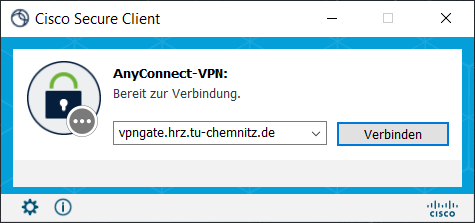
- At the first start of the client, enter the address vpngate.hrz.tu-chemnitz.de into the start window and click on „Connect“.
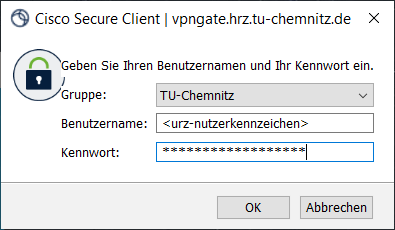
- In the field „Username:“ enter your username. The correspronding password is entered in the „Password:“ field.
By clicking „OK“ you are establishing a VPN connection.
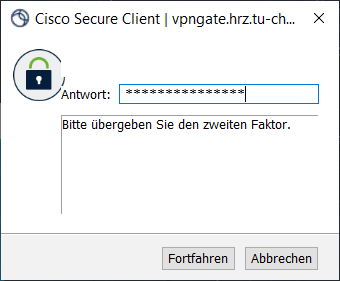
- If you have registered a second factor (Multi-Factor Authentication), this will be queried.
By clicking „Continue“ you're establising the VPN connection.
- After the successful connection, the Cisco Secure Client window is minimised and can be found under the Cisco symbol in the taskbar.
- The connection is terminated by „Disconnect“ in the Cisco Secure Client start window.
Frequenty Asked Questions(FAQ)
No. For security reasons, after starting the VPN client, all traffic is routed via the VPN tunnel and thus via the Chemnitz University of Technology campus network. The computer is logically part of the campus network. This means that all usage and security regulations of the URZ also apply.
Access to the following private address spaces is possible parallel to the VPN connection:
- 192.168.0.0/16
If these address spaces are used in the local network, access to local network resources (e.g. printers) is possible.
When using Cisco Secure Client, make sure that access to the LAN is permitted in the settings.

90 minutes when using the Cisco Secure Client
A maximum connection time of 72 hours currently applies to all Cisco Secure Client connections.
In principle, yes. However, the following should be noted. A new IP address is assigned to your computer when the VPN connection is established. This changes the identity of your computer to the AFS server. There have already been examples where this has led to AFS problems on the user side. Therefore, the following advice on how to proceed:
- Terminate the AFS client before establishing the VPN connection.
- Start the VPN connection.
- Starten AFS client again.
The same applies to terminating the VPN connection. Make sure that the AFS client is terminated before the connection is terminated.
When using a TLS-based VPN client:
- TCP-Port 443 TLS
- UDP-Port 443 DTLS
The URZ only offers support for the Cisco Secure Client and eduVPN. The use of alternative VPN clients is possible. Please note the following specifications:
- Installation and configuration of the VPN software is done exclusively by the user.
- The establishment of a VPN tunnel from the Internet to Chemnitz University of Technology is intended for connecting individual workstations. Routing functionality is only permitted for access to an existing local network. For the local newtork addresses from the private 192.168.0.0/16 have to be used.
- The functionality of the VPN connection using alternative VPN software cannot be guaranteed by the URZ.
- Check whether the corresponding data socket supports the access type VPN: overview of the data sockets in public rooms of the university.
If the VPN connection establishment works under Windows, but no data is transferred via the connection, there may be various causes:
- A network bridge has been installed on the computer. A network bridge is used to use other connections such as Firewire (IEEE 1394) as a LAN connection. To solve the problem, delete the network bridge.
-
Defective firmware of the wireless network card: Try to load a driver update from the manufacturer's website
(or from the manufacturer of the chip set). For the following wireless network cards problems are known:
- Intel PRO/Wireless 2200BG
-
Additionally installed software may have influence on the network access. To solve the problem, please delete this software.
Problems in connection with the following products have been reported:
- NetBalancer
- Connectify
By default, for secure connections (https) the IE7 checks for blocked server certificates. In doing so, it tries to establish connections to servers in the Internet. Such connections are not permitted before an authentication via VPN client. Therefore, it takes some time until this unsuccessful search is completed (several minutes). Hence, this creates the impression that the network connection does not work. To avoid this behavior, you can deactivate the option “Check for revoked server certificates”
To be found under:
Extras → Internet Options → Tab Extended → Security
After the installation of the VPN client, you can reactivate the option.
Possible reason: At one or more network interfaces, “Internet Connection Sharing” is activated.
Solution: Deactivate sharing the Internet connection.
In Windows OS, the data protection settings should be set to "medium high".
ICS (Internet Connection Sharing) may be active on your system. Deactivate the ICS service.
It is possible, that the file /etc/resolv.conf has been changed by the connection setup. If the system does not reset this file after the VPN connection is terminated, the name resolution and thus apparently the Internet access no longer works. The command
sudo dpkg-reconfigure resolvconf
may solve this problem.
Make sure that under „Cisco Secure Client settings” → „Preferences“ the option
- Allow local(LAN) access when using VPN (if configured)
is selected.
If there are still problems with local printing, you must configure your printer statically using the printer IP address. To do this, determine the IP address of your printer. This is often assigned automatically by your internet router. For example, if you are using a Fritzbox, you can find this under Home Network → Home Network Overview → Network Connections
Make sure that the internet router always assigns the same IP address to the printer. In the Fritzbox, select the printer entry and set the option “Always assign the same IPv4 address to this network device”. You can now use this IP address to set up your printer statically under Windows (configuration example Windows 10)
- Windows Settings → Devices → Printer & Scanner
- Add Printer or Scanner → Select “The printer is not listed”
- In the window “Search printer by other options” select “Add Priter by TCP/IP address or hostname” → Next
- In the window “Enter a printer hostname or IP address” enter the IP address → Next
- The printer is set up and can now be used also when the VPN connection is established.
Openconnect does not connect with current Cisco server versions anymore (openconnect bug).
As a workaround you can set the following openconnect option: --useragent=“AnyConnect“
The error occurs after a glibc update.
As a workaround the following change can be made:
Anyconnect up to 4.10.*: Become root and edit /opt/cisco/anyconnect/AnyConnectLocalPolicy.xml
Cisco Secure Client 5.*: Become root and edit /opt/cisco/secureclient/AnyConnectLocalPolicy.xml
Change the line with ExcludeFirefoxNSSCertStore from false to true
The error occurs due an API change by Apple in Mac OS, Cisco Secure Client uses this API from version 5.1 on and therefore needs new authorizations.
To eliminate this error, the background services for Cisco Secure Client must be allowed.
Open the system settings and navigate to “General”.
Open the “Login objects” submenu on the right-hand side.
In the “Allow in background” area, allow the “Cisco Secure Client - AnyConnect VPN Service” by activating the slider to the right.