Volume-Management im Linux
Hinweis zur Umgebung
- Beispiele stammen aus Scientific Linux 5.0
- LVM2
- Device Mapper
Überblick
Logical Volume Management
- Speicher-Virtualisierung
- Abstraktion physisch verfügbarer Speicherkapazitäten (block devices)
Quelle: https://www.redhat.com/docs/manuals/enterprise/RHEL-5-manual/Cluster_Logical_Volume_Manager/
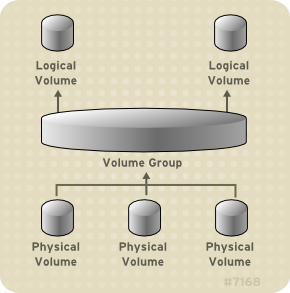
- Physical Volume (PV)
- block devices (Festplatten, Partitions, ...)
- Volume Group (VG)
- Zusammenfassung von PVs zu einem Pool von Speicherbereichen auf Festplatten
- Logical Volume (LV)
- Teil einer VG - linear, striped oder mirrored
Eigenschaften von Logical Volumes
- flexible Kapazität
- Filesysteme über mehrere Festplatten (oder Partitions)
- online resizing
- Verändern der Größe im laufenden Betrieb
- online data relocation
- Verschieben von Daten zwischen PVs im laufenden Betrieb
- freie Namenswahl
- inhaltsbezogene, frei wählbare Namen
- striping
- Verteilen der Daten eines LVs auf zwei oder mehrere PVs im Form von Stripes
- mirroring
- redundante Speicherung von Daten auf zwei oder mehr PVs
- snapshots
- "Einfrieren" des Zustands eines LVs zu einem definierten Zeitpunkt
- cluster-fähig
- mehrere Computer synchronisieren den Zugriff auf LVs
LVM Komponenten
Physical Volumes
- block device
- muss initialisiert werden
- LVM Label im zweiten 512 Byte Sektor
- persistente Kennzeichnung:
- random UUID
- size of block device
- Lokation der LVM Metadaten
- Lokation des Datenbereichs
- korrekte Identifikation
- Device Namen (
/dev/sda) spielen keine Rolle mehr, d.h. das PV wird auch erkannt, wenn sich sein Device Name geändert hat (Änderungen an der Hardware)
- Device Namen (
- Zugehörigkeit zu einer VG
- Stellung innerhalb der VG
- persistente Kennzeichnung:
- LVM Metadaten
- Konfigurationsdetails der VG
- Zeitstempel: wann erzeugt
- Name und VG-UUID
- Versionsnummer der Metadaten
- zugehörige PV's
- ...
- in 0, 1 oder 2 Kopien auf jedem PV einer VG (default: 1 Kopie)
- ASCII-Text
- 1. Kopie nach dem Label
- 2. Kopie am Ende des Gerätes
- Konfigurationsdetails der VG
- Empfehlung:
- Festplatten komplett LVM unterwerfen
- nicht partitionieren oder
- nur eine Partition für gesamte Festplatte
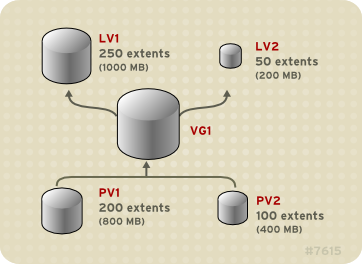
Volume Group
- Zusammenfassung von PVs
- verfügbarer Plattenplatz wird in sog. extents unterteilt
- feste Größe
- default: 4MB
- innerhalb der VG: Physical Extents (PE)
- LVs setzen sich aus Logical Extents (LE) zusammen
- die Größe der LE und PE ist identisch
- innerhalb einer VG ist die Größe der LEs in allen LVs identisch
- VG bildet LEs auf PEs ab
Logical Volumes
- VG wird in LV(s) untergliedert
- maximale Größe
- 32 Bit System: 16TB ( = 16384 GB)
- 64 Bit System: 8EB ( = 8192 PB = 8.388.608 TB = 8.589.934.592 GB)
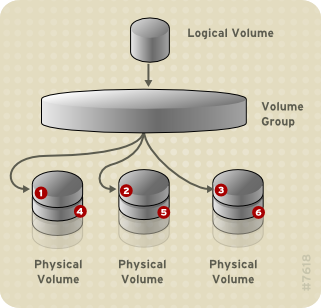
Linear Volumes
- einfachste Form
- Concatenation der PVs
- beliebige Größe
- Vielfaches der PE size
- maximal alle (bisher nicht vergebenen) PEs einem LV zuordnen
- kaum Einflussnahme auf Verteilung der Daten auf die PVs
Quelle: https://www.redhat.com/docs/manuals/enterprise/RHEL-5-manual/Cluster_Logical_Volume_Manager/
Striped Volumes
- gezielte Verteilung der Daten auf mehrere PVs
- kann I/O-Performance sequentieller Read-/Write-Operationen erhöhen
- vgl. RAID Level 0
Quelle: https://www.redhat.com/docs/manuals/enterprise/RHEL-5-manual/Cluster_Logical_Volume_Manager/
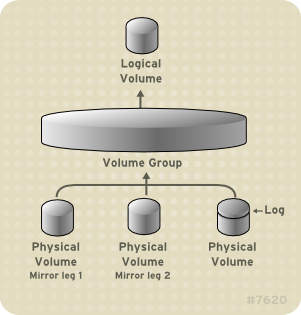
Mirrored Volumes
- identische Kopien der Daten auf mind. zwei PVs
- Schutz vor Gerätefehlern
- bei Ausfalls eines PVs wird das Mirrored Volume zum Linear Volume
- gespiegelt werden regions (default: 512KB)
- Log
- speichert Synchronisationsstatus der einzelnen regions
- auf Platte (default) oder im RAM
Quelle: https://www.redhat.com/docs/manuals/enterprise/RHEL-5-manual/Cluster_Logical_Volume_Manager/
Snapshot Volumes
- Virtuelle Abbilder existierender Volumes
- Zustand des Volumes zu einem bestimmten Zeitpunkt
- Anfertigung des Snapshots ohne Service-Unterbrechung
- Snapshots sind read/write
- Einsatzzwecke:
- Datensicherung, ohne langfristige Unterbrechung der Applikation
- Tests neuer Software-Versionen mit echten Daten
- Filesystem-Images virtueller Maschinen
- alle Snapshot Volumes eines Basis Volumes benutzen dieselben Datenblöcke
- bei Änderungen der Originaldaten werden neue Blöcke vergeben und die alten Inhalte dem Snapshot zugeordnet
- Achtung: Snapshot wird automatisch verworfen, wenn kein freier Platz mehr vorhanden ist, um Änderungen aufzunehmen
- Größe von Snapshots ist veränderbar
LVM Administration
Konfiguration
- alle für LVM relevanten Konfigurationsdaten liegen im Verzeichnis
/etc/lvm/- änderbar über Umgebungsvariable LVM_SYSTEM_DIR
- Einstellungen in
/etc/lvm/lvm.conf- Filter
- welche Geräte werden überhaupt betrachtet?
- Umgang mit Archiv/Backup der LVM-Metadaten
- Aufbewahrungsdauer
- Logging
- syslog, Logfile, ...
- Filter
-
/etc/lvm/lvm.conf- gut kommentiert
- viele Beispiele
- Manual:
man lvm.conf
- Aktuelle Konfiguration:
# lvm dumpconfig
devices {
        dir="/dev"
        scan="/dev"
        filter="a/.*/"
        cache="/etc/lvm/.cache"
        write_cache_state=1
        sysfs_scan=1
        md_component_detection=1
}
activation {
        missing_stripe_filler="/dev/ioerror"
        reserved_stack=256
        reserved_memory=8192
        process_priority=-18
        mirror_region_size=512
        mirror_log_fault_policy="allocate"
        mirror_device_fault_policy="remove"
}
global {
        library_dir="/usr/lib"
        umask=63
        test=0
        activation=1
        proc="/proc"
        locking_type=1
        fallback_to_clustered_locking=1
        fallback_to_local_locking=1
        locking_dir="/var/lock/lvm"
}
shell {
        history_size=100
}
backup {
        backup=1
        backup_dir="/etc/lvm/backup"
        archive=1
        archive_dir="/etc/lvm/archive"
        retain_min=10
        retain_days=30
}
log {
        verbose=0
        syslog=1
        overwrite=0
        level=0
        indent=1
        command_names=0
        prefix="  "
}
#
|
Device Mapper
- LVM2 wird realsisiert über den Device Mapper
- Kernel-Module (
dm_mod, u.a.) - Kommando
dmsetup - auch:
- Crypt-Devices (Modul
dm_crypt, Kommandocryptsetup) - Multipath-Devices (Modul
dm_multipath, Kommandomultipath) - BIOS-unterstütztes Software-RAID (Module
raid*, Kommandodmraid)
- Crypt-Devices (Modul
Prinzipielles Vorgehen
Setup
- Physical Volumes initialisieren
- Volume Group definieren (Namensraum!)
- Logical Volumes definieren (Namensraum!)
- Filesystem erzeugen (Label verwenden?: Namensraum!)
- Filesystem montieren
Vergrößern eines Volumes/Filesystems
- [Physical Volume initialisieren]
- [Physical Volume zu Volume Group hinzufügen]
- Logical Volume vergrößern
- Filesystem vergrößern
Festplatte ersetzen
- [neue Festplatte hinzufügen]
- [Physical Volume initialisieren]
- [Physical Volume zu Volume Group hinzufügen]
- Daten von altem PV auf neues PV verschieben
- altes PV aus VG entfernen
- Festplatte entfernen
LVM-Kommandos
Allgemeines
- Angabe von Einheiten (KB, MB, ...)
- explizit angeben
- keine Unterscheidung Groß-/Kleinbuchstaben: k,K,m,M,g,G
- default: Vielfaches von 1024
- Option
--units- Kleinbuchstaben
- Vielfaches von 1024
- 10m == 10.485.760 Byte
- Großbuchstaben
- Vielfaches von 1000
- 10M == 10.000.000 Byte
- Kleinbuchstaben
- Angabe von Namen (VG, LV)
- voller Pfadname ist optional
-
vg0/lvol0- Logical Volume
lvol0 - in Volume Group
vg0
- Logical Volume
- Weglassen der Angabe
- kontextabhängig
- LV: alle LVs der VG
- VG: alle VGs
-
lvdisplay- zeigt alle LVs aller VGs an
-
lvdisplay vg0- zeigt alle LVs der VG
vg0an
- zeigt alle LVs der VG
-
lvdisplay vg0/lvol0- zeigt LV
lvol0der VGvg0an
- zeigt LV
- Verbosity
- alle Kommandos verstehen Option
-v - Anzahl der
vbestimmt Umfang der Details - Maximum:
-vvvv
- alle Kommandos verstehen Option
- Hilfe zur Syntax
- Manuals
- Option
--help
- Display-Kommando
- Option
-C: Ausgabe in Tabellenform - Kommando
lvsentsprichtlvdisplay -C - analog:
pvs,vgs
- Option
# lvdisplay  --help
  lvdisplay: Display information about a logical volume

lvdisplay
        [-a|--all]
        [-c|--colon]
        [-d|--debug]
        [-h|--help]
        [--ignorelockingfailure]
        [-m|--maps]
        [--nosuffix]
        [-P|--partial]
        [--units hsbkmgtHKMGT]
        [-v|--verbose]
        [--version]
        [LogicalVolume[Path] [LogicalVolume[Path]...]]

lvdisplay --columns|-C
        [--aligned]
        [-a|--all]
        [-d|--debug]
        [-h|--help]
        [--ignorelockingfailure]
        [--noheadings]
        [--nosuffix]
        [-o|--options [+]Field[,Field]]
        [-O|--sort [+|-]key1[,[+|-]key2[,...]]]
        [-P|--partial]
        [--segments]
        [--separator Separator]
        [--unbuffered]
        [--units hsbkmgtHKMGT]
        [-v|--verbose]
        [--version]
        [LogicalVolume[Path] [LogicalVolume[Path]...]]
|
Kommandosuite lvm
- Subkommandos
- zahlreiche Subkommandos auch als eigenständige Kommandos verfügbar
# lvm lvm> help Available lvm commands: Use 'lvm help <command>' for more information dumpconfig Dump active configuration formats List available metadata formats help Display help for commands lvchange Change the attributes of logical volume(s) lvconvert Change logical volume layout lvcreate Create a logical volume lvdisplay Display information about a logical volume lvextend Add space to a logical volume lvmchange With the device mapper, this is obsolete and does nothing. lvmdiskscan List devices that may be used as physical volumes lvmsadc Collect activity data lvmsar Create activity report lvreduce Reduce the size of a logical volume lvremove Remove logical volume(s) from the system lvrename Rename a logical volume lvresize Resize a logical volume lvs Display information about logical volumes lvscan List all logical volumes in all volume groups pvchange Change attributes of physical volume(s) pvresize Resize physical volume(s) pvcreate Initialize physical volume(s) for use by LVM pvdata Display the on-disk metadata for physical volume(s) pvdisplay Display various attributes of physical volume(s) pvmove Move extents from one physical volume to another pvremove Remove LVM label(s) from physical volume(s) pvs Display information about physical volumes pvscan List all physical volumes segtypes List available segment types vgcfgbackup Backup volume group configuration(s) vgcfgrestore Restore volume group configuration vgchange Change volume group attributes vgck Check the consistency of volume group(s) vgconvert Change volume group metadata format vgcreate Create a volume group vgdisplay Display volume group information vgexport Unregister volume group(s) from the system vgextend Add physical volumes to a volume group vgimport Register exported volume group with system vgmerge Merge volume groups vgmknodes Create the special files for volume group devices in /dev vgreduce Remove physical volume(s) from a volume group vgremove Remove volume group(s) vgrename Rename a volume group vgs Display information about volume groups vgscan Search for all volume groups vgsplit Move physical volumes into a new volume group version Display software and driver version information lvm> exit Exiting. # |
Umgang mit Physical Volumes
Medien vorbereiten
Komplette Festplatte
- leere Parition-Table
- Vorsicht! Überschreiben des ersten Sektors löscht Master Boot Record
# dd if=/dev/zero of=/dev/sda bs=512 count=1 # fdisk -l /dev/sda Disk /dev/sda: 80.0 GB, 80026361856 bytes 255 heads, 63 sectors/track, 9729 cylinders Units = cylinders of 16065 * 512 = 8225280 bytes Disk /dev/sda doesn't contain a valid partition table |
Einzelne Partition
- Partition-Typ
0x8e
# sfdisk --change-id /dev/sdb 8 8e # fdisk -l /dev/sdb Disk /dev/sdb: 250.0 GB, 250059350016 bytes 255 heads, 63 sectors/track, 30401 cylinders Units = cylinders of 16065 * 512 = 8225280 bytes Device Boot Start End Blocks Id System /dev/sdb1 * 1 522 4192933+ 83 Linux /dev/sdb2 523 5744 41945715 83 Linux /dev/sdb3 5745 10966 41945715 83 Linux /dev/sdb4 10967 30401 156111637+ 5 Extended /dev/sdb5 10967 12924 15727603+ 83 Linux /dev/sdb6 12925 13055 1052226 83 Linux /dev/sdb7 13056 13309 2040223+ 82 Linux swap / Solaris /dev/sdb8 13310 30401 137291458+ 8e Linux LVM |
Verfügbare Medien suchen
# lvmdiskscan /dev/ramdisk [ 16,00 MB] /dev/sda [ 74,53 GB] /dev/ram [ 16,00 MB] /dev/ram2 [ 16,00 MB] /dev/ram3 [ 16,00 MB] /dev/ram4 [ 16,00 MB] /dev/ram5 [ 16,00 MB] /dev/ram6 [ 16,00 MB] /dev/ram7 [ 16,00 MB] /dev/ram8 [ 16,00 MB] /dev/ram9 [ 16,00 MB] /dev/ram10 [ 16,00 MB] /dev/ram11 [ 16,00 MB] /dev/ram12 [ 16,00 MB] /dev/ram13 [ 16,00 MB] /dev/ram14 [ 16,00 MB] /dev/ram15 [ 16,00 MB] /dev/sdb [ 232,89 GB] /dev/root [ 4,00 GB] /dev/sdb2 [ 40,00 GB] /dev/sdb3 [ 40,00 GB] /dev/sdb5 [ 15,00 GB] /dev/sdb6 [ 1,00 GB] /dev/sdb7 [ 1,95 GB] /dev/sdb8 [ 130,93 GB] 5 disks 20 partitions 0 LVM physical volume whole disks 0 LVM physical volumes # |
Physical Volumes initialisieren
# pvcreate /dev/sda /dev/sdb8 Physical volume "/dev/sda" successfully created Physical volume "/dev/sdb8" successfully created # lvmdiskscan -l WARNING: only considering LVM devices /dev/sda [ 74,53 GB] LVM physical volume /dev/sdb8 [ 130,93 GB] LVM physical volume 1 LVM physical volume whole disk 1 LVM physical volume # |
Informationen über Physical Volumes
# pvdisplay --- NEW Physical volume --- PV Name /dev/sda VG Name PV Size 74,53 GB Allocatable NO PE Size (KByte) 0 Total PE 0 Free PE 0 Allocated PE 0 PV UUID xFDOHb-akBC-YWZq-VN8A-ITy5-rya6-CCIpZq --- NEW Physical volume --- PV Name /dev/sdb8 VG Name PV Size 130,93 GB Allocatable NO PE Size (KByte) 0 Total PE 0 Free PE 0 Allocated PE 0 PV UUID IdEQhp-fvSe-xo7F-12H5-uIcQ-pqAb-7wY0wk # pvs PV VG Fmt Attr PSize PFree /dev/sda lvm2 -- 74,53G 74,53G /dev/sdb8 lvm2 -- 130,93G 130,93G # pvscan PV /dev/sda lvm2 [74,53 GB] PV /dev/sdb8 lvm2 [130,93 GB] Total: 2 [205,46 GB] / in use: 0 [0 ] / in no VG: 2 [205,46 GB] |
Weitere Operationen
Zuordnung von PEs eines PVs unterbinden
- Plattenfehler
- Platte soll entfernt werden
- PV muss bereits VG zugeordnet sein
# pvchange -x n /dev/sda # disable PE allocation Physical volume "/dev/sda" changed 1 physical volume changed / 0 physical volumes not changed # pvchange -x y /dev/sda # enable PE allocation Physical volume "/dev/sda" changed 1 physical volume changed / 0 physical volumes not changed # |
Daten zwischen PVs umlagern
- Voraussetzung zum Ersetzen von PVs (Festplatten)
- PVs leer räumen
- wird kein Ziel-PV angegeben, werden die belegten PEs auf freie PEs anderer PVs verteilt
- es können auch gezielt verlagert werden:
- einzelne PEs
- PE-Bereiche
- PEs eines LVs
# pvmove /dev/sda No data to move for t_local_01 # pvmove /dev/sda /dev/sdb8 No data to move for t_local_01 # |
Größe ändern
- z.B. wenn zugrundeliegendes RAID-Volume erweitert wurde
- Kommando
pvresize
Physical Volume entfernen
- Label löschen
- anschließend steht Medium wieder für andere Zwecke zur Verfügung
- PV darf keiner VG zugeordnet sein
- Kommando
pvremove
Umgang mit Volume Groups
Volume Group anlegen
- welche PVs (siehe oben)
- Namenskonvention für VG
- werden die Platten ggf. an anderen Host übernommen (Namenskonflikte)?
- evtl. Verwendungzweck reflektieren
# vgcreate t_local_01 /dev/sda /dev/sdb8 Volume group "t_local_01" successfully created # |
-
vgcreate-Optionen- Festlegen der Extent-Größe (default:
4M) - Limits für Anzahl der PVs und LVs (default:
0/ no limit) - Ändern der allocation policy (default:
normal)
- Festlegen der Extent-Größe (default:
Informationen über Volume Groups
# vgdisplay t_local_01 --- Volume group --- VG Name t_local_01 System ID Format lvm2 Metadata Areas 2 Metadata Sequence No 1 VG Access read/write VG Status resizable MAX LV 0 Cur LV 0 Open LV 0 Max PV 0 Cur PV 2 Act PV 2 VG Size 205,46 GB PE Size 4,00 MB Total PE 52597 Alloc PE / Size 0 / 0 Free PE / Size 52597 / 205,46 GB VG UUID 8A2Smu-0Zis-flVv-mqvb-uutW-UDOH-RvnwFs # vgs VG #PV #LV #SN Attr VSize VFree t_local_01 2 0 0 wz--n- 205,46G 205,46G |
- Informationen zu verfügbaren Geräten werden in
/etc/lvm/.cachegehalten - Suche nach weiteren Geräten (z.B. nach Änderungen an der Hardware - hot add) und Aktualisierung des Caches:
vgscan
# vgscan Reading all physical volumes. This may take a while... Found volume group "t_local_01" using metadata type lvm2 |
PVs hinzufügen/entfernen
- nur unbenutzte PVs können aus VG entfernt werden
- ggf. vorher mit
pvmoveleer räumen
# vgreduce t_local_01 /dev/sdb8 Removed "/dev/sdb8" from volume group "t_local_01" # vgs VG #PV #LV #SN Attr VSize VFree t_local_01 1 0 0 wz--n- 74,53G 74,53G # |
- Kapazitätserweiterung einer VG durch Hinzufügen von PVs
- PV muss initialisiert sein (
pvcreate)
# vgextend t_local_01 /dev/sdb8 Volume group "t_local_01" successfully extended # vgs VG #PV #LV #SN Attr VSize VFree t_local_01 2 0 0 wz--n- 205,46G 205,46G # |
Weitere Operationen
VGs aktivieren/deaktivieren und Attribute ändern
- VGs müssen explizit aktiviert werden
- während Boot-Vorgang oder nach
vgsan - dabei werden alle enthalten LVs verfügbar gemacht
- während Boot-Vorgang oder nach
- VGs müssen explizit deaktiviert werden
- z.B. vor Änderungen an der Hardware (hot remove)
- nur wenn enthaltene LVs nicht mehr benutzt werden (vorher
umount)
- Aktivieren/Deaktivieren ist auch für einzelne LVs möglich (
lvchange)
# vgchange -a y t_local_01 # aktivieren 0 logical volume(s) in volume group "t_local_01" now active # vgchange -a n t_local_01 # deaktivieren 0 logical volume(s) in volume group "t_local_01" now active # |
- Anmerkung: Wir haben bisher keine LVs erzeugt, deshalb werden beim Aktivieren der VG auch keine gefunden.
- Attribute ändern
- Anzahl max. möglicher LVs
- Anzahl max. möglicher PVs
- Größe der Extents
- ...
- Kommando
vgchange
VGs aufteilen/zusammenfassen
-
vgsplit- Aufteilen der PVs einer VG auf zwei VGs
- LVs können nur zu einer VG gehören
- ggf. vorher LVs gezielt auf bestimmte PVs verlagern (mit
pvmove)
-
vgmerge- Übernahme der PVs einer inaktiven VG in eine andere VG
VGs löschen
-
vgremove- VG darf keine LVs enthalten
- ggf. vorher löschen mit
lvremove
VGs umbenennen
-
vgrename
VGs exportieren/importieren
- Übernahme von VGs von einem Host zu einem anderen
-
vgexportnach dem Dekativieren der VG (vgchange -a n) - Hardware umbauen
-
vgimportam zweiten Host vor dem Aktivieren der VG (vgchange -a y)
Umgang mit Logical Volumes
Logical Volumes anlegen und Informationen anzeigen
- welche VG (siehe oben)
- Namenskonventionen
- default:
lvol#(#: 0,1,2,...) - evtl. Verwendungszweck reflektieren
- default:
- Kommando zum Anlegen von LVs
lvcreate - LV sind erreichbar als
/dev/vgname/lvname - Kommandos zum Anzeigen von Informationen
lvdisplay,lvs(vgl.vgdisplay,pvdisplay, ...)
Linear Volumes
- einfachste Form
- Angabe der Größe in GB
- Namen der LV
# lvcreate -L 10G t_local_01
  Logical volume "lvol0" created
# lvcreate -L 10G -n home01 t_local_01
  Logical volume "home01" created
# vgs
  VG         #PV #LV #SN Attr   VSize   VFree
  t_local_01   2   2   0 wz--n- 205,46G 185,46G
# lvdisplay -m
  --- Logical volume ---
  LV Name                /dev/t_local_01/lvol0
  VG Name                t_local_01
  LV UUID                bVtBQE-8ahV-1XwD-PzhV-JRLx-MVAt-Fpgp7F
  LV Write Access        read/write
  LV Status              available
  # open                 0
  LV Size                10,00 GB
  Current LE             2560
  Segments               1
  Allocation             inherit
  Read ahead sectors     0
  Block device           253:3

  --- Segments ---
  Logical extent 0 to 2559:
    Type                linear
    Physical volume     /dev/sdb8
    Physical extents    0 to 2559


  --- Logical volume ---
  LV Name                /dev/t_local_01/home01
  VG Name                t_local_01
  LV UUID                WhBmjc-Mo4A-L1n2-wcKR-nJCh-g4vL-GEgygR
  LV Write Access        read/write
  LV Status              available
  # open                 0
  LV Size                10,00 GB
  Current LE             2560
  Segments               1
  Allocation             inherit
  Read ahead sectors     0
  Block device           253:4

  --- Segments ---
  Logical extent 0 to 2559:
    Type                linear
    Physical volume     /dev/sdb8
    Physical extents    2560 to 5119


#
|
- Angabe der Größe in LE's
- Extent-Größe: 4MB (10GB == 2560 LEs)
# lvcreate -l2560 t_local_01
  Logical volume "lvol1" created
# lvdisplay -m t_local_01/lvol1
  --- Logical volume ---
  LV Name                /dev/t_local_01/lvol1
  VG Name                t_local_01
  LV UUID                T31Oxb-h1Bh-wM9s-hIIY-mbJT-JA4U-1ssc4C
  LV Write Access        read/write
  LV Status              available
  # open                 0
  LV Size                10,00 GB
  Current LE             2560
  Segments               1
  Allocation             inherit
  Read ahead sectors     0
  Block device           253:5

  --- Segments ---
  Logical extent 0 to 2559:
    Type                linear
    Physical volume     /dev/sdb8
    Physical extents    5120 to 7679

# lvcreate -l10%VG t_local_01   # 10% der VG
  Logical volume "lvol2" created
# lvdisplay -m t_local_01/lvol2
  --- Logical volume ---
  LV Name                /dev/t_local_01/lvol2
  VG Name                t_local_01
  LV UUID                eZELFq-Hi2H-txro-2GkA-s1L2-OfeF-EbDB7U
  LV Write Access        read/write
  LV Status              available
  # open                 0
  LV Size                20,54 GB
  Current LE             5259
  Segments               1
  Allocation             inherit
  Read ahead sectors     0
  Block device           253:6

  --- Segments ---
  Logical extent 0 to 5258:
    Type                linear
    Physical volume     /dev/sdb8
    Physical extents    7680 to 12938

# lvcreate -l10%FREE t_local_01 # 10% des noch freien Platzes
  Logical volume "lvol3" created
# lvdisplay -m t_local_01/lvol3
  --- Logical volume ---
  LV Name                /dev/t_local_01/lvol3
  VG Name                t_local_01
  LV UUID                dGpkE1-jmlv-Jjwv-qqoC-tzUz-VD13-6CPUvZ
  LV Write Access        read/write
  LV Status              available
  # open                 0
  LV Size                15,49 GB
  Current LE             3965
  Segments               1
  Allocation             inherit
  Read ahead sectors     0
  Block device           253:7

  --- Segments ---
  Logical extent 0 to 3964:
    Type                linear
    Physical volume     /dev/sdb8
    Physical extents    12939 to 16903

#
|
- explizite Aufteilung auf PVs
# pvdisplay /dev/sda |grep Allocated
  Allocated PE          0
# pvdisplay /dev/sdb8 |grep Allocated
  Allocated PE          16904
# lvcreate -vv -l 500 t_local_01 /dev/sda:0-250 /dev/sdb8:16904-17154
  Logical volume "lvol4" created
# lvdisplay -m t_local_01/lvol4
  --- Logical volume ---
  LV Name                /dev/t_local_01/lvol4
  VG Name                t_local_01
  LV UUID                XRa4SF-bh1P-qJyT-iaTt-ZGHh-FDpA-UTKSOd
  LV Write Access        read/write
  LV Status              available
  # open                 0
  LV Size                1,95 GB
  Current LE             500
  Segments               2
  Allocation             inherit
  Read ahead sectors     0
  Block device           253:8

  --- Segments ---
  Logical extent 0 to 250:
    Type                linear
    Physical volume     /dev/sda
    Physical extents    0 to 250

  Logical extent 251 to 499:
    Type                linear
    Physical volume     /dev/sdb8
    Physical extents    16904 to 17152

# dmsetup table t_local_01-lvol0
0 20971520 linear 8:24 384
# dmsetup table t_local_01-lvol4
0 2056192 linear 8:0 384
2056192 2039808 linear 8:24 138477952
#
|
Striped Volumes
- Anzahl der Stripes (nicht mehr als PVs in der VG)
- Option:
-i
- Option:
- Größe eines Stripes (entsprechend der Anwendung)
- Option:
-I - in KB
- default: 64KB
- Option:
# lvcreate -L 10G -i 2 -I 128 -n striped_vol t_local_01
  Logical volume "striped_vol" created
# lvdisplay -m t_local_01/striped_vol
  --- Logical volume ---
  LV Name                /dev/t_local_01/striped_vol
  VG Name                t_local_01
  LV UUID                qRzlnC-qZWf-Nzng-gc6J-ID31-XLRM-1sSFEL
  LV Write Access        read/write
  LV Status              available
  # open                 0
  LV Size                10,00 GB
  Current LE             2560
  Segments               1
  Allocation             inherit
  Read ahead sectors     0
  Block device           253:10

  --- Segments ---
  Logical extent 0 to 2559:
    Type                striped
    Stripes             2
    Stripe size         128 KB
    Stripe 0:
      Physical volume   /dev/sda
      Physical extents  1531 to 2810
    Stripe 1:
      Physical volume   /dev/sdb8
      Physical extents  18433 to 19712

# dmsetup table t_local_01-striped_vol
0 20971520 striped 2 256 8:0 12542336 8:24 151003520
#
|
Mirrored Volumes
- Anzahl der Mirror (Anzahl vorhandener PVs beachten)
- Option
-m
- Option
- Log
- auf separatem PV (persistent)
- benötigt zusätzliches PV
- im RAM
- Option
--corelog - erfordert Resynchronisation nach jedem Boot
- Option
- auf separatem PV (persistent)
- Synchronisation
- initiale Synchronistation unterdrücken
- Option
--nosync
- Option
- initiale Synchronistation unterdrücken
- Realisierung
- es werden zwei (oder mehr) Linear Volumes erzeugt (mirror legs)
- mirror legs werden gespiegelt
# lvcreate -L 10G -m 1 -n mirrored_vol t_local_01
  Not enough PVs with free space available for parallel allocation.
  Consider --alloc anywhere if desperate.
# lvcreate -L 10G -m 1 -n mirrored_vol --corelog t_local_01
  Logical volume "mirrored_vol" created
# lvdisplay -m t_local_01/mirrored_vol
  --- Logical volume ---
  LV Name                /dev/t_local_01/mirrored_vol
  VG Name                t_local_01
  LV UUID                r1xI6S-7jN2-DkQY-l5Zp-reQT-49N9-X6c1lZ
  LV Write Access        read/write
  LV Status              available
  # open                 0
  LV Size                10,00 GB
  Current LE             2560
  Segments               1
  Allocation             inherit
  Read ahead sectors     0
  Block device           253:13

  --- Segments ---
  Logical extent 0 to 2559:
    Type                mirror
    Mirrors             2
    Mirror size         2560
    Mirror region size  512,00 KB
    Mirror original:
      Logical volume    mirrored_vol_mimage_0
      Logical extents   0 to 2559
    Mirror destinations:
      Logical volume    mirrored_vol_mimage_1
      Logical extents   0 to 2559

# lvs -o vg_name,lv_name,devices t_local_01/mirrored_vol
  VG         LV           Devices
  t_local_01 mirrored_vol mirrored_vol_mimage_0(0),mirrored_vol_mimage_1(0)
# dmsetup table |grep t_local_01-mirrored_vol
t_local_01-mirrored_vol: 0 20971520 \\
                      mirror core 2 1024 block_on_error 2 253:11 0 253:12 0
t_local_01-mirrored_vol_mimage_1: 0 20971520 linear 8:24 161489280
t_local_01-mirrored_vol_mimage_0: 0 20971520 linear 8:0 23028096
#
|
- Umwandlung zwischen Linear und Mirrored Volumes
# lvconvert -m 1 --corelog t_local_01/lvol0
  Logical volume lvol0 converted.
# dmsetup table|grep lvol0
t_local_01-lvol0_mimage_1: 0 20971520 linear 8:0 43999616
t_local_01-lvol0: 0 20971520 \\
                   mirror core 2 1024 block_on_error 2 253:14 0 253:15 0
t_local_01-lvol0_mimage_0: 0 20971520 linear 8:24 384
# lvconvert -m 0 t_local_01/lvol0
  Logical volume lvol0 converted.
# dmsetup table|grep lvol0
t_local_01-lvol0: 0 20971520 linear 8:24 384
#
|
Größe ändern
- Größe ändern ist im laufenden Betrieb möglich
- Interaktion mit Filesystem beachten
LV verkleinern
- ACHTUNG: vorher Filesystem verkleinern (das können nur einige!)
- frei werdende PEs können
- für neues LV benutzt werden
- vorhandenes LV erweitern
- relative oder absolute Angaben möglichen
- verkleinern um einen Betrag (extents oder units) oder auf einen festen Wert (extents oder units)
# lvdisplay -m t_local_01/lvol2
  --- Logical volume ---
  LV Name                /dev/t_local_01/lvol2
  VG Name                t_local_01
  LV UUID                eZELFq-Hi2H-txro-2GkA-s1L2-OfeF-EbDB7U
  LV Write Access        read/write
  LV Status              available
  # open                 0
  LV Size                20,54 GB
  Current LE             5259
  Segments               1
  Allocation             inherit
  Read ahead sectors     0
  Block device           253:6

  --- Segments ---
  Logical extent 0 to 5258:
    Type                linear
    Physical volume     /dev/sdb8
    Physical extents    7680 to 12938

# lvreduce -L -5G t_local_01/lvol2
  WARNING: Reducing active logical volume to 15,54 GB
  THIS MAY DESTROY YOUR DATA (filesystem etc.)
Do you really want to reduce lvol2? [y/n]: y
  Reducing logical volume lvol2 to 15,54 GB
  Logical volume lvol2 successfully resized
# lvdisplay -m t_local_01/lvol2
  --- Logical volume ---
  LV Name                /dev/t_local_01/lvol2
  VG Name                t_local_01
  LV UUID                eZELFq-Hi2H-txro-2GkA-s1L2-OfeF-EbDB7U
  LV Write Access        read/write
  LV Status              available
  # open                 0
  LV Size                15,54 GB
  Current LE             3979
  Segments               1
  Allocation             inherit
  Read ahead sectors     0
  Block device           253:6

  --- Segments ---
  Logical extent 0 to 3978:
    Type                linear
    Physical volume     /dev/sdb8
    Physical extents    7680 to 11658

# lvreduce -l -50%LV /dev/t_local_01/lvol2
  WARNING: Reducing active logical volume to 7,77 GB
  THIS MAY DESTROY YOUR DATA (filesystem etc.)
Do you really want to reduce lvol2? [y/n]: y
  Reducing logical volume lvol2 to 7,77 GB
  Logical volume lvol2 successfully resized
#
|
LV vergrößern
- unbenutzte PE's hinzufügen
- anschließend Filesystem vergrößern
- relative oder absolute Angaben möglichen
- vergrößern um einen Betrag (extents oder units) oder auf einen festen Wert (extents oder units)
# lvextend -L 10G !$
lvextend -L 10G /dev/t_local_01/lvol2
  Extending logical volume lvol2 to 10,00 GB
  Logical volume lvol2 successfully resized
# lvdisplay -m t_local_01/lvol2
  --- Logical volume ---
  LV Name                /dev/t_local_01/lvol2
  VG Name                t_local_01
  LV UUID                eZELFq-Hi2H-txro-2GkA-s1L2-OfeF-EbDB7U
  LV Write Access        read/write
  LV Status              available
  # open                 0
  LV Size                10,00 GB
  Current LE             2560
  Segments               1
  Allocation             inherit
  Read ahead sectors     0
  Block device           253:6

  --- Segments ---
  Logical extent 0 to 2559:
    Type                linear
    Physical volume     /dev/sdb8
    Physical extents    7680 to 10239

#
|
Besonderheit: Erweitern von Striped Volumes
- VG muss über ausreichend Platz in den PVs verfügen
- ggf. müssen mehrere PVs der VG zugefügt werden
- Beispiel:
- VG aus zwei PVs
- ein Striped Volume
- kein freien PEs mehr in VG
- es müssen zwei PVs hinzugefügt werden, bevor das Striped Volumes vergrößert werden kann
Weitere Operationen
Attribute ändern
-
lvchangeanalogvgchange
LVs umbenennen
# lvrename t_local_01 lvol2 home02 Renamed "lvol2" to "home02" in volume group "t_local_01" # lvs LV VG Attr LSize Origin Snap% Move Log Copy% home01 t_local_01 -wi-a- 10,00G home02 t_local_01 -wi-a- 10,00G lvol0 t_local_01 -wi-a- 10,00G lvol1 t_local_01 -wi-a- 10,00G lvol3 t_local_01 -wi-a- 15,49G lvol4 t_local_01 -wi-a- 1,95G lvol5 t_local_01 -wi-a- 10,00G mirrored_vol t_local_01 mwi-a- 10,00G 100,00 striped_vol t_local_01 -wi-a- 10,00G # |
LVs löschen
- vorher:
umountfür das enthaltene Filesystem - Empfehlung: LV zunächst dekativieren
# lvchange -a n t_local_01/lvol3 # lvs LV VG Attr LSize Origin Snap% Move Log Copy% home01 t_local_01 -wi-a- 10,00G home02 t_local_01 -wi-a- 10,00G lvol0 t_local_01 -wi-a- 10,00G lvol1 t_local_01 -wi-a- 10,00G lvol3 t_local_01 -wi--- 15,49G lvol4 t_local_01 -wi-a- 1,95G lvol5 t_local_01 -wi-a- 10,00G mirrored_vol t_local_01 mwi-a- 10,00G 100,00 striped_vol t_local_01 -wi-a- 10,00G # lvremove t_local_01/lvol3 Logical volume "lvol3" successfully removed # |
Benchmark-Vergleich
- bonnie++ 1.03
- benutzt wurden die oben eingerichteten LVs
- Linear Volume
lvol0 - Striped Volume
striped_vol - Mirrored Volume
mirrored_vol
- Linear Volume
- Filesystem: ext3
Version  1.03      ------Sequential Output------ --Sequential Input- --Random-
                    -Per Chr- --Block-- -Rewrite- -Per Chr- --Block-- --Seeks--
               Size K/sec %CP K/sec %CP K/sec %CP K/sec %CP K/sec %CP  /sec %CP
lvol0            4G 35921  90 54807  37 23090  15 28292  69 57133  12 156.4   1
striped_vol      4G 40288  97 93582  50 36063  23 45096  90 92818  23 226.8   1
mirrored_vol     4G 39075  96 45241  30 24082  17 40536  82 53966  11 152.6   1
Snapshots
- erzeugen mit
lvcreate -s -L ... - Größe bezieht sich auf Platz für Unterschiede zwischen Original und Snapshot
- weitere Einträge in Device Mapper Table (
cow: copy on write) - typisch: 15-20%
- Beachten:
- LVM kennt Inhalte des Volumes nicht
- im Snapshot enthaltenes Filesystem, Datenbank, ... kann inkonsistent sein
- Anfertigen des Snapshots mit Anwendung (Filesystem, ...) synchronisieren
# dmsetup table | grep lvol0
t_local_01-lvol0: 0 20971520 linear 8:24 384
# lvcreate -L 2G -s -n lvol0_snap01 t_local_01/lvol0
  Logical volume "lvol0_snap01" created
# dmsetup table|grep lvol0
t_local_01-lvol0: 0 20971520 snapshot-origin 253:14
t_local_01-lvol0_snap01-cow: 0 4194304 linear 8:0 43999616
t_local_01-lvol0-real: 0 20971520 linear 8:24 384
t_local_01-lvol0_snap01: 0 20971520 snapshot 253:14 253:15 P 16
# lvdisplay -m t_local_01/lvol0
  --- Logical volume ---
  LV Name                /dev/t_local_01/lvol0
  VG Name                t_local_01
  LV UUID                bVtBQE-8ahV-1XwD-PzhV-JRLx-MVAt-Fpgp7F
  LV Write Access        read/write
  LV snapshot status     source of
                         /dev/t_local_01/lvol0_snap01 [active]
  LV Status              available
  # open                 0
  LV Size                10,00 GB
  Current LE             2560
  Segments               1
  Allocation             inherit
  Read ahead sectors     0
  Block device           253:3

  --- Segments ---
  Logical extent 0 to 2559:
    Type                linear
    Physical volume     /dev/sdb8
    Physical extents    0 to 2559# lvdisplay -m t_local_01/lvol0_snap01
  --- Logical volume ---
  LV Name                /dev/t_local_01/lvol0_snap01
  VG Name                t_local_01
  LV UUID                U3I1Jr-8v2Q-dpH1-HKn3-AvWb-GnsE-GHfZAx
  LV Write Access        read/write
  LV snapshot status     active destination for /dev/t_local_01/lvol0
  LV Status              available
  # open                 0
  LV Size                10,00 GB
  Current LE             2560
  COW-table size         2,00 GB
  COW-table LE           512
  Allocated to snapshot  0,00%
  Snapshot chunk size    8,00 KB
  Segments               1
  Allocation             inherit
  Read ahead sectors     0
  Block device           253:7

  --- Segments ---
  Logical extent 0 to 511:
    Type                linear
    Physical volume     /dev/sda
    Physical extents    5371 to 5882

# lvs
  LV           VG         Attr   LSize  Origin Snap%  Move Log Copy%
  home01       t_local_01 -wi-a- 10,00G
  home02       t_local_01 -wi-a- 10,00G
  lvol0        t_local_01 owi-a- 10,00G
  lvol0_snap01 t_local_01 swi-a-  2,00G lvol0    0,00
  lvol1        t_local_01 -wi-a- 10,00G
  lvol4        t_local_01 -wi-a-  1,95G
  lvol5        t_local_01 -wi-a- 10,00G
  mirrored_vol t_local_01 mwi-a- 10,00G                        100,00
  striped_vol  t_local_01 -wi-a- 10,00G
#
|
- Snapshots sind modifizierbar
- mit
lvsprozentualen Füllstand des Snapshots beobachten - ggf. Snapshot mit
lvextenderweitern - Original-Volume kann erweitert - aber nicht verkleinert werden
- ein zu 100% ausgelasteter Snapshot wird verworfen
# mkdir /mnt/lvol0
# mkdir /mnt/lvol0_snap01
# mount /dev/t_local_01/lvol0 /mnt/lvol0
# mount /dev/t_local_01/lvol0_snap01 /mnt/lvol0_snap01
# df -k /mnt/lvol0 /mnt/lvol0_snap01
Dateisystem          1K-Blöcke   Benutzt Verfügbar Ben% Eingehängt auf
/dev/mapper/t_local_01-lvol0
                      10321208    154236   9642684   2% /mnt/lvol0
/dev/mapper/t_local_01-lvol0_snap01
                      10321208    154236   9642684   2% /mnt/lvol0_snap01
# dd bs=1M count=10 if=/dev/zero of=/mnt/lvol0/10M
10+0 Datensätze ein
10+0 Datensätze aus
10485760 Bytes (10 MB) kopiert, 0,0875638 Sekunden, 120 MB/s
# lvs
  LV           VG         Attr   LSize  Origin Snap%  Move Log Copy%
  home01       t_local_01 -wi-a- 10,00G
  home02       t_local_01 -wi-a- 10,00G
  lvol0        t_local_01 owi-ao 10,00G
  lvol0_snap01 t_local_01 swi-ao  2,00G lvol0    0,50
...
# dd bs=1M count=20 if=/dev/zero of=/mnt/lvol0_snap01/20M
20+0 Datensätze ein
20+0 Datensätze aus
20971520 Bytes (21 MB) kopiert, 0,152044 Sekunden, 138 MB/s
# lvs
  LV           VG         Attr   LSize  Origin Snap%  Move Log Copy%
  home01       t_local_01 -wi-a- 10,00G
  home02       t_local_01 -wi-a- 10,00G
  lvol0        t_local_01 owi-ao 10,00G
  lvol0_snap01 t_local_01 swi-ao  2,00G lvol0    1,28
...
|
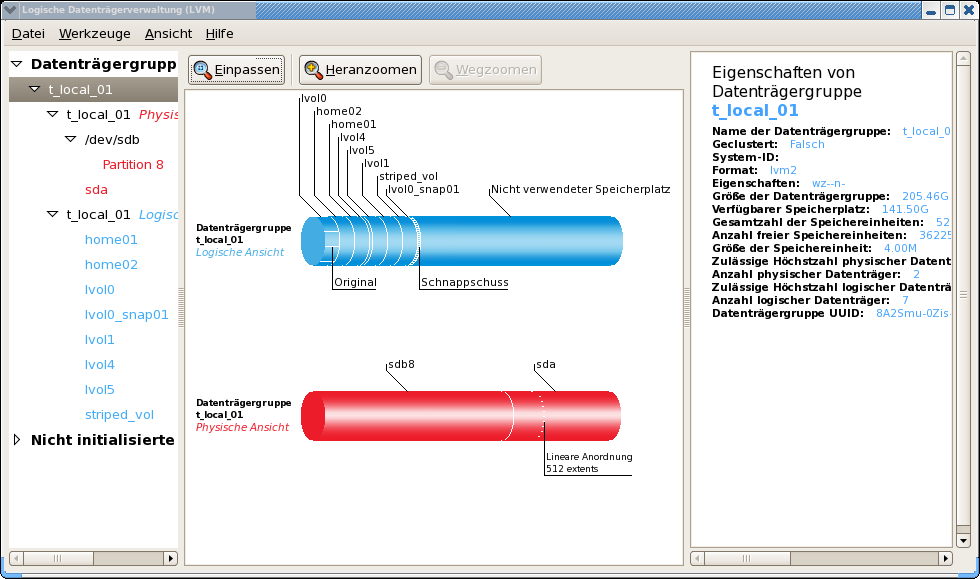
LVM-GUI
-
system-config-lvm
Verweise und Literatur
- LVM Administrator's Guide in Red Hat Enterprise Linux Documentation
- LVM Howto


